Wednesday, April 22, 2009

Earth Day Activity with The Lorax


We read The Lorax by Dr. Suess this week, enjoyed an ongoing discussion about the importance of trees, and followed up with this art activity today, making our own "Truffula Trees."


I cut toilet paper rolls in half lengthwise and the kids painted them brown. Then we glued them to a piece of construction paper. Next we put some cotton balls in a plastic container with some green tempera powder, popped the lid on and shook. The result was a variety of shades of green puffs, perfect for truffula trees! (Or thneeds, if you're familiar with the book!)


My 5-year-old son is very intent on realism in his artwork right now, so he needed the book to look at as he painted the Lorax next to his tree. The two 2-year-olds had no such requirements and went to town painting yellow suns and Loraxes all over their pages:


Happy Earth Day!

Thursday, April 16, 2009

Lounging Lettuce Licker

Toby surveys his territory while posing for a picture in the garden


Then he gets distracted by luscious, leafy lettuce...see the pink tongue peeking out?

As a pup, he would come trotting across the yard with an entire head of rotted garlic clenched proudly in his teeth. I should have known that if he'll eat from the compost pile, he'll eat from the pan of fresh baby lettuces! Yum! Remind me to triple wash before serving salad!!!

Tuesday, April 14, 2009

Rainy Day Art: Stained-Glass Masterpieces

Contact paper, colored tissue and a permanent marker were all we needed to make these beautiful stained-glass creations:


Even without the sun shining through, they sure brightened up our dining room window on this stormy day!

Monday, April 13, 2009

Snapshot


Our back yard was the perfect setting for a casual, low-key breakfast on Easter morn.
KID 2 enjoys a bit of coffee cake while the dog enjoys the crumbs!
Bon Appetit!

Sunday, April 12, 2009

Happy Easter!

My mom raised four kids all by herself for most of our growing up years. I love finding little ways to honor her dedication (blood, sweat and tears, but also a lot of fun throughout the years!).

Here is the little Easter token of gratitude I put together for her. I also did one for Paul's mom, who had three little chicks of her own:

Happy Easter! Have fun with your little chicks today!

Friday, April 10, 2009

The Best Nest!


We got this nest idea from montessori mama's post today and decided to get right to work building our own nests. We just read The Best Nest by P.D. Eastman, so we found materials similar to the ones Mr. and Mrs. Bird used to build their nest:
stocking string (yarn)
soda straws
hay (paper confetti and basket filler)
horse hair (pink Easter grass)

We started with the rolled-down brown paper bag (I helped with this step), and they painted glue inside their nests and up the sides. Then they went to town adding gobs of nest-building decor! We'll put Easter eggs in when they are dry (they also used gobs of glue!).


This was a fun and easy project!


Wednesday, April 8, 2009

Fun Little Bunnies

This cute little book reading bunny makes a
sweet centerpiece on our Easter table! ($10 at BIG Lots!)
We've filled his basket with our special decorated eggs. It could also hold a small potted plant.

KID 2 uses the captain's chair, so I had to modify the bunny cover to fit.


KID 1 really likes his special chair!

The bunny covers turned out really cute! I used Elmer's bonding spray to adhere the pieces. If you let it dry for a few minutes, the bond is repositionable. This means we can make other holiday/seasonal pieces for the same covers. When Easter is done, we'll put these bunny pieces in a zip bag for next year! I like the Birthday Throne cover idea at Family Fun!

Tuesday, April 7, 2009

Spring Planting Project: Upside-Down Tomatoes


A fun and easy spring gardening project to try with your little ones involves repurposing your plastic 2L soda bottles. Cut off the bottom, turn it upside down, punch holes around the top for twine or string (we reinforced ours with colored duct tape), and put a small tomato plant upside down through the neck of the bottle. Fill with soil, then water and hang in a sunny spot.


Enjoy watching your tomatoes grow upside down!


Sunday, April 5, 2009

An Easy Easter Project and Fun New Resource!

We recently opened a fresh new stack of colored construction paper (a BIG event around here!) and KID 1 was anxious to make something. I did a search for "construction paper crafts" online and came up with a cool site with alphabetized paper crafts:

http://www.dltk-kids.com/type/paper.htm

They also offer thematic materials, such as the Brown Bear, Brown Bear, What Do You See? link with printable templates for coloring or making feltboard characters (there's a brown bear, red bird, yellow duck, etc.). They call this collection of resources the Book Breaks. Check out the Nursery Rhymes section, too! I wish I had known about this site sooner!

For those of you working on letters or numbers of the week, this could be a great resource for hands-on projects!

We started with the Easter Chick and added some fluffy yellow feathers to his wings. KID 1 liked cutting all the basic shapes and then putting them together to make something new. I wonder what we'll make next...hmmmmm...

Wednesday, April 1, 2009

Playdough Resurrection Cross


Favorite Lent Activity: The Resurrection Cross (in playdough!)

Homemade playdough, small cookie cutters and white birthday candles are all the supplies you'll need to create this countdown cross. Each Sunday we light one less candle leading to Good Friday (when our Light went out). During Sunday dinner or devotional time is a good time to incorporate this activity. Turn overhead lights off for good visual effect and note how it gets darker each week as you light fewer and fewer candles.
Do a special lighting on Good Friday and let the kids blow all the candles out. Light them all again on Easter Sunday, symbolizing Jesus's resurrection. His sacrifice enabled his light to shine all over the world and right into our hearts.
Note: It's not too late to create your resurrection cross. Just pick up with this coming Sunday's lighting and blow out all but one.

Tuesday, March 31, 2009

Favorite Homemade Play Dough Recipe

1 cup flour
1/2 cup salt
2 teaspoons cream of tartar
1 tablespoon cooking oil or baby oil
1 cup water

Mix ingredients together. Stir constantly over medium heat until play dough consistency is formed. Cool and knead. Store in a tightly covered plastic container. Add food coloring to the water before adding it to the other ingredients, or knead in colors at the end while still warm (kids enjoy this part!).

We love this recipe and use it for playgroups and projects all the time! A triple batch makes enough dough for 6-8 kids.

Monday, March 30, 2009

Celebrating Easter with Preschoolers

Easter is hopping up on us, so this week we thought we'd share some of the ways we celebrate this season and holiday with our little chicks.

Easter Decor


Speaking of chicks, our little barnyard babies (stuffed lambs, chicks, ducks, and bunnies) adorn the house to remind us of the new life of Christ.


Check out this cute Nest O' Fluffy Chicks craft over at Family Fun. We'll try this one this week!

And the Bunny Chair Covers look so easy! I'll make these myself this week and surprise the kids when they come out for breakfast one morning...they'll love it!


Eggs - Once a pagan symbol, the egg became a Christian symbol of the empty tomb left behind when Christ rose from the dead. At MOPS last week, we decoupaged eggs using Mod Podge and decorative paper napkin cut-outs. They were pretty cute! The detailed project how-to is over at Martha Stewart's site.

Glittered eggs are always fun and easy for preschoolers. Just let them paint the entire egg with thinned-out glue and then roll it in a bowl of glitter. Dazzling!

Books, books, books - Several weeks before Easter, we pull out all our Spring and Easter books. We have quite a stack, but a few rank among our favorites:
Three Ducks Went Wandering
by Ron Roy, pictures by Paul Galdone
We love the illustrations. Directional phrases like "RIGHT IN FRONT OF..." and "RIGHT UNDER..." are educational and fun, letting the kids guess what's coming next. Paul Galdone is a gifted illustrator.


Seven Little Rabbits

by John Becker, Illustrated by Barbara Cooney

Fun, repetitive story of seven silly little rabbits who never make it to Toad's house. Barbara Cooney's illustrations are so lovely!


The Golden Egg Book
by Margaret Wise Brown

The author of Goodnight Moon writes a cute tale of a bunny who finds an egg and wonders what could be inside. He falls asleep after his great efforts to crack open the egg (unsuccessfully), at which point the baby duck emerges from his egg and wonders what this furry little brown sleeping thing could be.


Home For A Bunny

by Margaret Wise Brown


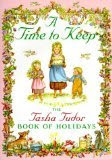
A Time to Keep:
The Tasha Tudor Book of Holidays

A lovely illustrated book of holidays
and traditions of old...very nostalgic and sweet!


We also have a couple of children's bibles and bible storybooks that tell the Easter story. We read this during devotional time before we make our resurrection crosses. I'll post more details about the playdough resurrection cross tomorrow!


Do you have any favorite Easter books or traditions?


Saturday, March 7, 2009

Time to Get a Timer?


Check out my list of great uses for timers with preschoolers over at MotleyMoms:

Monday, March 2, 2009

A Book, a Boy, and a Body

Kids never cease to amaze me with their natural curiosity and limitless enthusiasm for things that inspire them! Our son, age 5, recently amazed us with his artistic (and scientific) rendition of the human body. As is often the case around here, the jumping off point was a book he read before bed with his daddy, The Magic School Bus Inside the Human Body, by Joanna Cole and Bruce Degen. (We love this series of science discovery books. They're well-illustrated by the talented Bruce Degen, and offer lots of detailed information about each topic in a very kid-friendly format.)


Upon waking the next morning, KID 1 informed us, "I'm going to make the human body today!"


"Oh. Okaaaaay...how do you plan to do that?" I inquired, my curiosity piqued.


I offered clay, but he declined. He said he needed paper, markers, and paint.


"Great!" I responded enthusiastically, relieved that we had all those supplies on hand.


He proceded to set his easel area, completely unassisted, with every paint pot we own, each with its own paintbrush standing at the ready.

I noticed he had found the Magic School Bus book from the previous evening's bedtime reading, along with a larger lift-the-flap book of the human body. Both were propped at his feet, ready for close inspection.


I taped up his paper and he set to work immediately, starting with an outline of a body. Then he was flipping through his books feverishly, stopping on pages that intrigued him to add an organ here, a blood vessel there, a representative bone or an important muscle. The end result is amazing (and funny: note the green blob of brain!).


When he finished his painting, I asked him about each part he included in his body and he matter-of-factly named each one for me so I could label it. Kidneys. Esophagus. Windpipe. Large intestine. Small intestine. The villi inside the small intestine. All the while, I'm thinking "Is this normal? He's only five! How does he remember all this, yet can't identify letter "Gg" correctly?"


Thank God for good books that feed my child what I didn't know he craved. Amazing.

Lent for Preschoolers: A Hands-On Activity


We love making our faith a more hands-on experience for our children, especially during important seasons of the religious calendar. Lent can be a tough one to explain in a tangible way, but most kids are familiar with the phrase "Jesus is the light of the world."

Building on this concept, last year I gave my 4-year-old a batch of white playdough and a few smaller balls of colored dough to create his Resurrection Cross. You can read about it on my MotleyMoms post and see a couple of photos of this easy project.

Have fun!

Friday, February 27, 2009

A Little Art

One Little, Two Little Budding Artists
The Hands of an Artiste!
Her Marvelous Mix-Up!
Just a little window into our creative morning...I can't wait to show you what he created! When he finished, he said, "Oh, Mommy! I'm just so impressed with myself!" Nothing like a little confidence, huh? ;-D


Tuesday, January 27, 2009

Pasta Bird Nests

My kids love these because they make the usual spaghetti meal unusual. I twist some cooked spaghetti into the oiled cups of my jumbo muffin tin and make a depression in the center to form the "nest." Any flavor pasta works (we use whole wheat blend) and I'd guess pretty much any style works as long as it's long like spaghetti.

I drizzle olive oil on top and sprinkle whatever shredded cheese I have on hand and bake at 350 F for 5-10 minutes (just enough to melt the cheese and set the nests).

Meatballs are fun toppers as the "eggs" in the nest, but sometimes we just drizzle sauce over the nests and serve them plain. The kids love 'em!


Friday, January 23, 2009

Winter Discovery Table

As I packed up the Christmas decorations, I decided to leave my snowman collection out for our unit on "Winter." I put fresh batteries in the light-up snowman tree so the kids could see it lit up at eye level. The table has several drawers, so mittens, hats and scarves can play a part in our winter discovery.

Since we live in Central Florida, winter is still just a concept for our preschoolers. I pulled out all the books we own relating to winter, including Snowmen at Night by Caralyn and Mark Buehner; The Mitten by Alvin Tresselt; Welcome Back, Sun by Michael Emberley; The Jacket I Wear in the Snow by Shirley Neitzel and Nancy Winslow Parker; All You Need for a Snowman by Barbara Lavallee; and several easy readers about animals in winter.

The TV table makes a perfect discovery table, now that we got rid of the set in our living room. We never watched it anyway! This is our winter discovery table:


How do you celebrate winter?

Friday, January 9, 2009

Old Jeans + Quilt Binding = Cute Apron!


This is the apron I made for my niece (age 9 1/2) for Christmas. She is very fashionable and loves to do cooking projects, so I knew she needed a hip little apron.
I save old jeans for various uses. These were my husband's old Gap jeans. I cut one back pocket for the top of the apron and used the front of the jeans as the skirt. Black quilt binding finished the edges and I used some cute polka dots for the sash. I also handstitched her first initial onto the front bib pocket, but didn't get a picture of that.
It turned out so cute, and she really liked it! Now I want one for myself!

Monday, January 5, 2009

Where the Wild Things Were

The Wild Things were out in full force last night for our son's 5th birthday party, lakeside. We built a bonfire on the beach and gave each kid a pair of binoculars so they could spy wild things. They were invited to take a boat ride around the edge of the lake to observe local wildlife, enjoying the amazing sunset on the ride back to the beach.


KID 2 and KID 1 enjoy the sunset from the bow of Uncle Mark's boat


If you're not familiar with the classic story Where the Wild Things Are, by Maurice Sendak, read my post from last week. The Birthday Boy's Max suit was just a pair of thermal longjohns and a furry tail. I made the tail removable with these clips and the hood was a separate piece. He pretty much just looked like he was running around in his underwear after about 20 minutes of the party! Oh, well!


I also sewed lots of wild animal print tails for our wild guests to wear. They were a hit, but I didn't get any pictures. It was totally dark by the time we got back from the boat ride and got our tails situated! I first saw them here, but decided I could make them easily for a lot less. Plus I could choose any wild print I wanted! We ended up with zebra tails with hot pink feathers at the end, cow tails, leopards, lizards, and more. I used one clip per tail and they stayed on just fine.


Each goody bag also included a mask for them to color and wear...there just wasn't enough time before it got really dark (which was fine with everyone, since it was really all about the bonfire!).


I decided while I was shopping for the wild dinner that we really needed to serve wild punch. I found some green Tampico kiwi, strawberry, guava juice and paired it with ginger ale. These were poured over a punchbowl full of gummy worms and craisins (to look like bugs). The Craisins floated, but the gummyworms lurked on the bottom for anyone unfortunate enough to scoop their punch from the bottom of the bowl...it was great!


After a quick meal of hotdogs and chips (ahem...not the most nutritious meal, but there were supposed to be small ears of corn...we just completely forgot them)...I prepped them before storytime so their terrible roars, terrible claws, gnashing teeth, and rolling eyes were ready for their cue. What fun to read Where the Wild Things Are by the fireside with a bunch of enthusiastic wild things!


When we got to the wild rumpus part of the story, we did the hokey pokey and sang wild songs around the fire. Then we passed around a sackful of hand instruments: drums, shakers, rattles, sticks, tambourine, you name it. What a wonderful racket we made marching around that bonfire, each child so proud of his and her individual contribution to the din!


It's hard to stop a wild rumpus cold turkey, so we roasted marshmallows after that, each kid turning in his or her instrument to gain a roasting stick and marshmallow. We enjoyed the wild thing cupcakes while Birthday Boy opened his gifts by the fire. It was a spectacular night. The stars were bright, the wind off the lake kept us cool, and the bonfire kept us entertained! I think it was the best birthday party I've ever been to...but I'm such a kid at heart! I'm very easy to please!