Saturday, August 30, 2008
Peachy Keen
Friday, August 29, 2008
The Puppetmaster


Who needs a puppet theater? Even four-year-olds can be frugal...but we call it creative genius around here!
Thursday, August 28, 2008
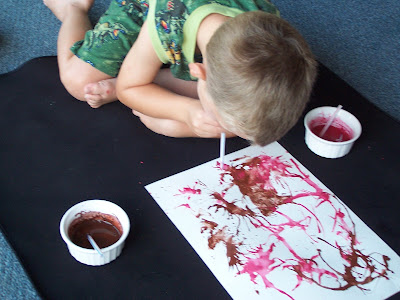
Making Their Marks: Straw Painting


Wednesday, August 20, 2008
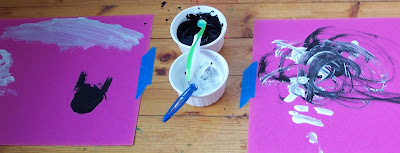
Making Their Marks: Toothbrush Paintings


Check out more of our fun art ideas! Or check out Crystal's blog for more Frugal Friday links.
Tuesday, August 19, 2008
It's raining, it's pouring: TS Faye

It's been pouring down rain and gusting up to 60 mph winds here in Central Florida. Hello, Tropical Storm Faye!
We donned rubber boots and bathing suits and spent a pleasant morning puddle-jumping in the soft drizzle before the bulk of the storm hit. Rain without lightning is pretty unusual for us, so we took advantage!
Sunday, August 17, 2008
Saturday is Yard Day
 Not even 1-year-olds!
 Not even guests!
 The kids collect baby pineapples as we transplant the plants.
Making room for a vegetable garden!
Our niece spent the night Friday, blissfully unaware of the full day of yard work that would greet her in the morning, bright and early. We realized she was really into it, though, when an early thunderstorm rolled in and she complained, "Man, I really wanted to get this job done! Do you think we can go back out later to finish?"
Come back any time, honey! You're always welcome here!
Wednesday, August 13, 2008
"J" is for "Just Kiddin'"
 Our Jet Pilot!
We'll be making jewels this week using rock salt, glue and food coloring and we'll also make a self-propelled jet. I can't wait to see how that works! Both of these projects are from the Kid Concoctions

I got the chance to take a Kid Concoctions workshop from the Thomases last year. One of their demo projects was a set of juggling balls made from balloons. Neither of them could juggle, so they asked for a volunteer...I do love an audience! Yes, I can juggle!
We're also doing lots of spontaneous jumping jacks throughout the day (Kid 1 gets excited about these things...4 is a great age!).
We don't have a jump rope, but I do have a length of rope for the kids to jump over as we jiggle and jerk it.
We will make our letter "j" sign using a 6x6" square of cardboard cut from a diaper box, some colored paper, glue and a popsicle stick. Last week, for the letter "S," we made a silver, sparkly "S" sign with glitter. I still keep finding glitter in strange places (like, the corner of my eye, my upper lip, inside my bra, all over our bed, and dumped all over the office floor...use it at your own risk!).
For some great letter "s" ideas, check out Teresa's blog!
In case you're wondering "What does she do with her little one while KID 1 does all these cool (messy) projects?," the answer is, KID 2 gets to do almost everything her big brother does. The goals are just a bit different. If KID 1 is glittering up a letter, KID 2 (almost 2 years old) is making a glittery picture and we talk about what color the glitter is. Most activities can be slightly modified for the younger sibling. Even though she is not ready for phonics, she is still developing the phonemic awareness necessary for reading later on.
Sunday, August 10, 2008
"S" is for "SICK"

Our little one is burning up with fever for the third day in a row. She's listless and clingy (that part is nice, except she's so hot, it's uncomfortable to hold her for more than a few minutes...but if she wants to be held, we do it).
It's so frustrating to see our children fighting viruses, one after the other, and there's really nothing we can do for them. Some days I start to feel like maybe we should just stay home for a few months, just to be well for a while! Forget MOPS, forget playdates, forget working out at the gym, swimming at the pool, and going to church. We're staying IN HERE, and we're gonna stay WELL!!! No more colds, no more vomitting, no more inhalers, no more diarrhea, no more coughs, no more thermometers, no more ibuprofen, no more!!! I'm SICK of being sick all the time.
Except, then we would never see our friends, or chase butterflies, or name groceries that start with the letter "S," or ride bikes, or celebrate friends' birthdays, or cook once a month with girlfriends, or learn French for preschoolers, or sing and dance at music class...and the list goes on and on.
Lord, please help our little one get well so she can chase butterflies tomorrow. Amen.
Friday, August 8, 2008
Playroom Purge: Toys We Kept
Here they are, in no particular order:
- Blocks...stacking, nesting, giant cardboard bricks, small alphabet cubes, duplo mega blocks, wood architectural blocks, and Lincoln Logs are all great.
- Wooden Puzzles and rack, and stacking/sorting toys
- Costumes: hats, costume jewelry, playscarves, vests, medical kit, fun accessories
- Musical Instruments: (Preferably wood for a natural sound) Rhythm sticks, drum, triangle, tambourine, moracca/shakers, xylophone
- Baby Doll and clothes, blanket and stroller
- Art Supplies: Crayons, markers, colored pencils; paper:colored construction, sketch pad, watercolor pad, origami papers, colored tissue paper, BIG paper, paper roll/butcher paper; glue (sticks and white glue); scissors; paper punchers; paint: fingerpaint, tempera; modeling clay
- Kitchen set with play stuff: We repurposed a little wooden telephone cabinet we were given by drawing a burner on the top surface and a knob. The play food goes inside the cabinet doors. When our daughter was a baby, she absolutely loved opening and shutting the doors. We have a Melissa and Doug wooden play food set that came in four little wooden crates, and our 4-year-old likes to save empty canisters and boxes and decorate them for his play kitchen.
- Puppets and puppet theater (only because Mommy really likes puppets, so Daddy made Mommy a puppet theater for our son's birthday!) Actually, both kids love the puppets, and we love that they encourage verbal and social/emotional skills. Our toddler goes around with a dolphin hand puppet saying, "Heh-woh! Heh-woh!" (Hello!) The kids often have their puppets "talk" to each other, which is totally cute!
- Books, books, and more books! We LOVE books! We read all day long. Our home library is quite extensive, full of children's classics, but we also LOVE getting books from the public library.
- Cars and trucks of all sizes and a town playmat with roads and buildings...these were all hand-me-downs, but our kids love them. This stays on the front porch in a basket.


We try not to buy electronic toys, but we have a few that have been given as gifts. Sometimes they disappear in the dark of night if they're really annoying or just not played with much. One of our favorites is a Leap Frog alphabet set with letters and word cards...we like this one because it's tactile (the letters are 3-Dimensional) and it sounds out the words and letters. This is an older set, so I don't think they make it anymore.
The key to choosing toys is finding things that:
- spur your child's imagination
- keep them engaged and learning
- grow with your child - avoid toys that have a short shelf life
Above all, it must be FUN!
Check out some other toy recommendations over at Rocks In My Dryer.
Monday, August 4, 2008
Making Their Marks: Cars and Trucks and Things That Go!


Preschool Art: Making Their Marks

Friday, August 1, 2008
Pizza! Pizza!
 Pizza is a Friday night favorite in our family. Not only does it satisfy our appetites, it also satisfies our budget and health requirements! There's nothing better than homemade pizza...especially when the kids get to help.
 We start by making our own dough, a whole wheat/oat/white flour blend that really handles nicely and fills us up better than all white flour. It takes less than an hour to rise, so I can start it around 4:30 and still have dinner on the table by 6:00. This also freezes well in an oiled zip-top bag, so we make a double batch and freeze half. Less work next time!
- 1 TBSP active dry yeast
- 1/2 cup whole wheat flour
- 1/2 cup dry quick oats
- 2-3 cups white flour (start with 2, adding more as needed)
- 1 tsp. salt
- 1 TBSP sugar (I use a lot, since yeast feeds on sugar and will need more if frozen or kept in the fridge for a few days)
- 1 cup very warm water (hot water kills yeast)
- 1 TBSP olive oil
 Toppings:
- 1/3 cup red sauce (or pesto) We just use regular pasta sauce from a jar...fancy, huh?
- 2 cups shredded cheese - Italian blends are good, mozzarrella, smoked provolone
- Your favorite toppings - we love colossal-size black olives, red onion, peppers, tomatoes, garlic...really just whatever we have on hand. We throw on leftover grilled, chopped chicken breast or sausage when we have it.
- Mix dry ingredients in a large mixing bowl.
- Stir in water and olive oil (a stand mixer works, too, if it can handle a stiff dough...switch to bread hooks once you've got your ingredients mixed)
- If kneading by hand, turn dough out onto floured surface. As you knead, slowly add more white flour until dough is no longer sticky (it should feel smooth and elastic). Kids love to help knead the dough. You can separate it into smaller lumps for them to work with and combine at the end for a final thorough kneading.
- Place in an oiled bowl, turning to coat, and cover with plastic wrap. Set in a warm, dry place to rise until doubled in bulk. (If the sunny spot on my back porch isn't warm enough, I pre-warm my oven and then turn it off to let the dough rise.)
- Once dough is doubled, show it off to the kids...it's fascinating! Punch it down and press into an oiled pan (we use a round pizza pan, but a cookie sheet works fine, too).

- Add sauce, cheese and toppings...this part is fun for the kids, as long as you supervise. Our cheese always seems to pile up in one spot!
- Bake in preheated 450°F oven for 12-15 minutes.
- Enjoy!
See some of our favorite pizza-making books below. The Little Red Hen Makes a Pizza is very cute, and Pete's a Pizza, by William Steig, is a fun read that our kids just LOVE to act out.
