Wednesday, July 30, 2008

A Playspace That Works


I love creating kid-friendly spaces! Our playroom (an enclosed side porch Realtors technically called a "third bedroom," since it has a tiny closet) has been a work in progress since we moved in 2 years ago...for a few reasons:
  1. As our kids grow and change, their playtime changes, too. Especially in the first few years! We've finally landed on some things that BOTH kids can play with, albeit differently, in their age-appropriate ways. Even my 9-year-old niece has a ball in our playroom...and it's designed with preschoolers in mind!

  2. We kept reorganizing things to see what works best in this small space (an 8 x 5' rug just fits with a few feet of bare floor left over for the art table and chairs). Our goal: to create a space that both our kids can enjoy and then clean up...without a lot of adult intervention.

  3. We had too much stuff in the playroom...it's been a process of elimination. What we're left with is a great selection of classic toys. We only kept what the kids actually play with, and we tried to focus on toys that will stand the test of time and accommodate their growing skills and imaginations. Coming Soon: Playroom Purge: The Toys We Kept

We are really blessed to have a playroom space completely dedicated to playtime. However, these ideas can be applied to any space you call a play space. We chose to put our son and daughter in one bedroom, figuring they can comfortably share a room while they are little. So far, we're happy with our decision, since we get to use the "third bedroom" as play space.

For the playroom, I took my cue from my son's preschool classroom. It, too, was a very small space, and it had to accommodate TEN three-year-olds! If Miss Ann could do it, I knew I could turn our small space into a kid-friendly place for two!

And like most preschool classrooms, our playroom is organized into "centers," which thrills my son to no end. We have the dress-up center, housekeeping, trucks and blocks, art table center, manipulatives (puzzles, stacking toys, beads, and sorting shapes), a music center, and lots and lots of children's books. I was thrilled when the puzzle rack I ordered arrived...slowly, but surely, each thing in the playroom finds a special home!


Because space (and money) is limited, I've had to get creative with our storage. As I went through the kids' bedroom closet, weeding out anything I could, I added this old diaper organizer to the pile of donations...until my practical side won out. I thought, "Surely I can find a way to use it somewhere in the house!" It became our music center, handily organizing and displaying our instruments for easy access.

Eventually, we hope to have built-in storage in the playroom, complete with pull-out trays for musical instruments, like my resonator set from the Musikgarten company. It's beautiful and deserves a special place of its own. For now, sadly, it rests on the floor beneath the diaper --I mean, music--caddy.

We may have mismatched shelving units, some tall, some short, but the space serves its purpose where it counts: at the eye level of a preschooler!

Monday, July 28, 2008

Rhythm Shakers


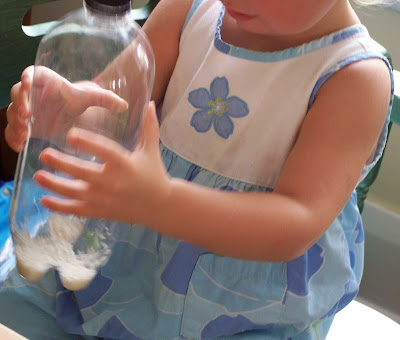
One activity that both our kids enjoy blends art and music: making and decorating their own rhythm shakers. We had so much fun with this, we did it again with friends for our 4th of July parade, and again for a MOPS Jamboree playdate!
You will need:
  • Empty containers: No glass, please!
  • Stickers or colored tape
  • Noisy fillers
  • Measuring spoons
  • Funnel (you can roll a piece of paper)
  • Hot Glue Gun
  1. Start with a couple of empty containers from the recycling bin. Clean, dry plastic bottles work fine (soda, water, milk jugs, popcorn seed jars, condiments, all shapes and sizes work fine, as long as they still have a lid or top...we even took the label off a white acetaminophen bottle), coffee cans, salt containers, etc.
  2. Decorate the containers: We take the labels off, when possible. Stickers or colored tape are easy and fun. Markers work well on cardboard containers, like salt or oatmeal cylinders. You could even decorate your own paper label and tape it on.
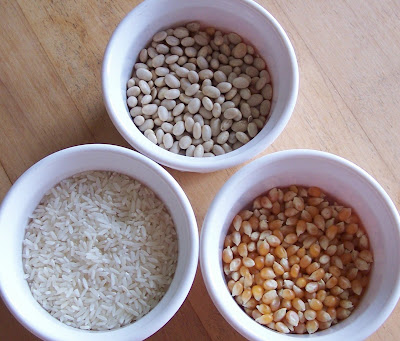
  3. Offer some different noise-making fillers, one type per container: a bowl of dry rice, a bowl of dry beans, small jingle bells, small pebbles, popsicle sticks, popcorn seeds...anything that will make a great sound inside the container.
  4. Just a tablespoon or two of filler is plenty for a shaker...this isn't going to deplete your rice or beans supply. Consider buying some just for crafts; they make great cheap collage material! A funnel helps younger kids get more filler into their bottle and less on the floor! We made one out of paper.
  5. Hot glue the lid on, so no accidental spills end the fun too soon. Just keep the hot glue gun out of reach of small hands.
  6. Notice with your child how each container sounds different. Talk about the different sounds. Why do you think the beans sound different than the rice? Is the rice louder or softer than the other materials? Etc.

  7. Put on some music or just sing a silly song and jam with your rhythm shakers!

Friday, July 25, 2008

Cheap Art: Beautiful Junk


We LOVE art time around here, and with two preschoolers who don't understand the concept of "use it sparingly," we really burn through our supplies quickly. So in order for my kids to be creative, I have to get creative with materials. Okay, the coffee mug on the end is what gets Mommy through our beautiful art sessions in the morning!


Here is our "Beautiful Junk" Art Box (these are for collages, inventions, or whatever inspires them):


My 4 1/2 year-old son loves the empty containers for creating cool stuff like rockets, robots, food for his kitchen, etc. For a while, he saved every cereal box for his unnamed "project," piling them all over the kids' craft table, until I finally had to dump them in the recycling bin in the dark of night.


Hey, you know you do it, too! My husband and I are like the sneaky nighttime bandits when it comes to purging junky toys, favorite WAY-outgrown clothes, and random collections of things: rocks, sticks, acorns, boxes, etc.


Anyway, back to our beautiful junk. We use the pasta for stringing on necklaces or adding to a collage. I try to find interesting shapes and colors. We also have a bin of pasta tubes...I'm not sure where that one disappeared to.


My mom, a former preschool teacher of 12 years, picked up some Easter basket filler when it went on clearance one year and gave it to my son for his art projects. He LOVED it! It's the paper kind, not plastic, so it glues onto paper really well (and it won't hurt if my toddler gets a bit in her mouth...it happens!) Now I pick up a couple of bags of Easter grass/filler after Easter every year...it's super-cheap.
Do you have any frugal favorites for art time?


Thursday, July 24, 2008

Creative Kids Playdate

I truly wish I had my camera this morning at our MOPS (Mothers of Preschoolers) playdate! Darn it!!! We had a great turnout of kids, too!

A friend of mine, Bryssy of RadicoolLife, organized a cup cooking activity for the kids. At one station, following the illustrated instructions, they measured 3 tablespoons of gingerbread mix (a box mix), and 1 Tbsp. of water into a paper cup with their name on it. Popsicle sticks were provided for levelling and stirring. At the end of that station, their cups were put into an electric skillet, set to 400 degrees, for 10-15 minutes.

Then they moved over to the lemonade station. Each kid measured 1/4 cup of water into a cup, then 2 tsp. of sugar, stirring to dissolve. Then they squeezed half a lemon over a bowl and added 2 tsp. of lemon juice to their sugar/water solution. A bowl of ice waited at the end of the table to make their homemade lemonade cool and refreshing! Yum!

While they waited for their gingerbread snack to bake and cool, we headed into the craft area. My station was all set for torn paper art a la Eric Carle (for examples, see yesterday's Art After Breakfast blog). Once again, I provided:
  • A stack of Eric Carle books, all in his signature paper collage-style illustrations
  • Colored construction paper on each table
  • Paper egg cups of glue with cotton swab applicators
  • Large construction paper for the base of their project

We had some beautiful creations! One table chose a little grey mouse, another group worked on a black and white dairy cow, while others were inspired by an apple tree illustration, all from various Eric Carle books.

Cleanup was easy...I keep all the scrap paper in a zip-top bag for my beautiful junk box. What looks like trash to us is artistic treasure to a kid! We threw away the glue cups, stashed the extra paper in my bag, and wiped down the tables. I love it when playdates go this well!

The gingerbread cup cooking was a hit, by the way. When Miss Bryssy took the cups out of the electric skillet, she set them upside down on plates to cool. The little muffins dropped to the plates as they cooled and the kids found the cup with their name on it with their little baked treat hiding beneath...they loved it! Scroll down for a selection of Eric Carle's books available through our Amazon.com store.


Wednesday, July 23, 2008

Art After Breakfast: Torn Paper Collage


I love to start the kids' day with art time...it gets their creative juices flowing and creates a bit of down time before my toddler's morning nap.

This morning we used Eric Carle's The Very Hungry Caterpillar as our inspiration. We looked through it together and I pointed out how the pictures looked like a collage of different colored paper.

My 4 1/2 year-old son decided he wanted to make all of the junk food that the caterpillar ate through: "one piece of chocolate cake, one ice-cream cone, one pickle, one slice of Swiss cheese, one slice of salami, one lollipop, one piece of cherry pie, one sausage, one cupcake, and one slice of watermelon."

Materials I provided:

  • Our inspiration book (The Very Hungry Caterpillar)
  • Construction paper: 1 piece of each color
  • White glue in a small cup and cotton swab applicator (he doesn't like to touch the glue...some kids don't like the feel of glue or paint on their fingers)
  • One large piece of construction paper as the base

Even my 1 1/2-year-old participated. She loves using glue, but she struggled with tearing the paper, so I tore some pieces into different shapes and piled them up for her. I only gave her a tiny glob of glue at a time, since she likes to tip and pour her glue out. She has no qualms about using her finger in the glue. Each kid is so different!


This was a fun project for both of my preschoolers. It's easily adaptable for a variety of ages, so hopefully it works as well for you as it works for me!

Friday, July 18, 2008

Sunsuits and Cowgirl Boots


Our kids usually hit the ground running around 6AM. This morning is no exception.

KID 1 has his bathing suit on, ready for a beach day with friends. He's busily seated at the art table, having a ball with Scotch tape. We like to offer the kids a variety of materials to experiment with at the art table.

KID 2 has donned her cowgirl boots and is happily tromping around the playroom, doing splits on the carpet and working with manipulatives.

What fun! This sure beats last week, when we had to abandon the house so it could be tented for termites. Check out my Motley Moms blog to learn how we discovered we had termites.

Thursday, July 17, 2008

Sunflowers Personified

As I was taking the kids to the library for storytime this morning, we stopped by our sunflower patch to see how our little seedlings were doing. We were delighted to see several of our sunflowers developing distinct personalities.


Although bright yellow on the outside, these guys were looking a little blue.


And this sunflower must have a little secret to tell...or maybe she'll just keep it to herself.


This one, we are sure, must have declared his love for her. He just couldn't hide it any longer!

Wednesday, July 16, 2008

The Wilds


It always amazes me how long our kids can stay outside, happily chasing butterflies, terrorizing roly-polies, and generally wreaking havoc on nature.

They lose track of time, they're so engaged in their surroundings. I find this to be true of very young children, especially preschoolers.

"Outside" was one of the first Baby Signs our kids picked up on. To sign "outside," you turn your hand in front of you as if grasping and turning a doorknob. For the ASL (American Sign Language) version, check out this terrific ASL Browser video dictionary, run by the Michigan State University Communication Technology Lab.

Our little girl, 1 1/2 years old, has been known to violently jab the air in front of her with both hands at once, screeching, "Ah-diiii! Ah-diiiiiiii!"

?????

Thank God for Baby Signs!

A Penny for Your Thoughts or Just Give Me All the Money In Your Wallet

Our 4 1/2 year-old son, we'll call him Kid 1, just drags his feet anytime we ask him to do something. Correction: anytime we ask him to do something that does not fully align with his agenda-of-the-moment. My husband asked him to go put his wallet away and come to the dinner table. The sound of his feet dragging could be heard into the next room. Paul asked him to put his wallet away and come to the dinner table "by the time I count to three, or I get to keep all the money in your wallet." (Kid 1 likes to keep a bit of spare change in his own little wallet and tote it wherever we go.)

Well, this was taken as a challenge. Our boy suddenly had a rocket attached to his feet. He raced into his room and came skidding back into the dining room sans wallet before Paul could say 2 1/2. He victoriously cocked his hands on his hips and declared, "Now I get to keep all the money in your wallet!"

We've tried different behavior modification strategies over the past two years with him, some successful, some not-so-successful. Here are the highlights:

  • Penny In The Jar: "Every time I catch you following directions the first time, you get to put a penny in the jar!!!" In theory, it could have merit, but I didn't always have a penny (or the jar), and so this one lacked immediacy. If we were away from the house (which we are a lot, for my own sanity) I would forget to give him his pennies when we got back home. This may work well with an older child who can remember how many pennies they've earned. This one didn't last long for us.

  • Bunny Bucks (Now this was an elaborate one): Similar to the "penny in the jar" method, I decided to give my son a "bunny buck" anytime I caught him doing good. Completing his simple chores, following directions, using nice manners, whatever behavior we were working on at the time, got reinforced with bunny bucks. Then, at the end of the day, he could use his earnings to buy a prize from my "store." Prizes were usually from the dollar store, but sometimes included things like cake mix, worms in dirt (chocolate pudding with crushed chocolate cookies on top and gummy worms "crawling" out), or a special project with Mom. I put a price on each thing, along with a visual marking system ($3 items had 3 bunny bucks drawn underneath so he could count to determine how many bucks it would cost him). This way, he was learning number values in conjunction with family values. This was a successful one, our son loved it, and eventually he was only allowed to "shop" once a week; but if I try this one again, I would put more focus on the activities and special projects, rather than the tangible prizes.

As parents, my husband and I struggle with the idea of using tangible prizes to reinforce good behavior. Sometimes it's appropriate, but we don't want our kids to feel like they should get something when they behave or do their chores. We don't want to encourage that feeling of entitlement kids can develop when they are blessed with every thing a kid could need, plus some. This blessing can too easily become a curse, for both the child and the parents.

  • Kid K'Nex, another take on tangible rewards: A more recent experiment involved a building set I wanted for Kid 1. We needed something a bit more advanced for him, but not too difficult for a 4 1/2 yr. old to manipulate on his own. I finally found Kid K'Nex "Zoomin' Buddies," a set that had wheels and googly eyes and other fun parts. But we didn't just hand it over to him. After all, it wasn't his birthday or Christmas...he had to earn it first!

Each time Kid 1 followed directions the first time, he earned a new piece to build with. This was amazing! By the time he earned all the pieces, he was doing his chores, getting himself dressed, brushing his teeth, and presenting himself at the breakfast table in "TA-DAAAA!" pose. He never failed to inform us when he did things without even being asked. Today, he usually still gets himself dressed and ready for his day without any prompting from us, or tangible reward. We sometimes have to remind him to brush his teeth or pick up his dirty laundry, but the morning routine is so much easier now that Kid 1 is in the habit of doing these things by himself. Yea!

As a parent, I know my strategies will have to change as my child changes. What works for me today may not work tomorrow, and it may not work with KID 2. I look at parenting as a great experiment and try to have fun with it!

Do you have any tried-and-true or crash-and-burn stories of parenting?